Bleed refers to objects that extend beyond the edge of the printed page. This page tells you why bleed is needed, how much is needed and how to fix issues with bleed.
For an example of the use of bleed, look at the image below. The picture of the monkey and the gray rectangle go beyond the edge of the page. They ‘bleed off’ the edge of the paper.

Full bleed means that an image extends beyond the edge of the page on all four sides.
Why do you need to add bleed?
1. Once a job has been printed, the press sheets need to be folded, bound and trimmed. For each of these finishing steps, there is a certain margin of error. Bleed makes it easier to avoid issues with:
- mechanical limitations
- the behavior of the paper when running at high speed through a machine
- operator errors
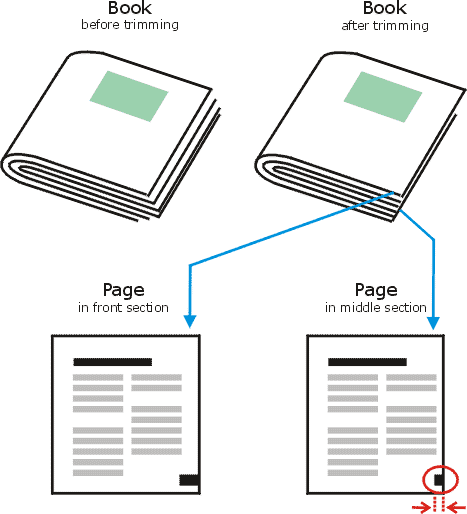
2. When a press sheet is folded multiple times, the thickness of the paper causes the inner pages to gradually shift. This is called creep or shingling.

To compensate for this effect, the entire content of pages is shifted slightly to the left or right, depending on production needs and the design of the content. To be able to move pages, you need the content to extend a bit beyond the trimmed page size.
3. Paper is an organic material which may shrink when it is subjected to humidity and mechanical stress.
What happens if no bleed is used?
If the page content exactly fits the page itself, such errors could cause a thin white line to show at one of the edges of the page. To avoid such lines, the design elements have to extend beyond the trim edge of the page.
Actually all the reasons why bleed is needed also explain why small design elements should not be positioned too close to the outer edges of the document. If a small page number is put right at the edge of the page and that page is trimmed incorrectly, the page number may simply get cut away.
How much bleed is needed?
Generally, the bleed amount is set to 3 millimeters or 1/8 of an inch. Many prefer a bit more bleed – 5 millimeters – especially for large books, thickish paper or jobs with many sections.
Bleed requirements can be different from one printing company to another and from one job to another. Contact your printer in case of doubt or look up their recommendations on their website. Once the design of a job has been finalized, modifying bleed can be a real hassle so it is better to start off using the correct value.
The fact that content needs to extend beyond the page boundaries is no excuse for sloppy design. Letting images extend beyond the needed bleed clutters the file, can lead to bloated PDF files and simply looks sloppy. The prepress systems used at the printing company can trim any excessive bleed but why cause problems that are so easy to avoid?
To make a designer’s life easy professional design applications like Adobe InDesign allow you to specify the amount of bleed that is needed. This will be shown as an extra guide around the page.

Some applications allow you to crop images to their image frame when creating a PDF. In InDesign, this option is called ‘Crop Image Data To Frames’ in the Compression tab of the PDF Export window. Activating this option makes the resulting PDF file smaller but it also makes it very difficult for a prepress operator to tweak bleed settings afterward if you didn’t use (enough) bleed.
How to edit bleed or add it to a document?
Not all applications support bleed and not all designers are aware of the need to extend content beyond the page edge.
- Changing bleed in native files is the easiest, as long as you have the matching application at your disposal.
- For PDF files, things are a bit more difficult:
- First of all the bleed box may need adjusting.
- As long as it are simple objects that need to bleed, using an editor like PitStop to edit a PDF is a lot of work but still doable. Using the Position window you can alter the dimensions of rectangles.
- As soon as images are involved, things get more difficult. Sometimes pictures have a clipping path applied to them and removing or changing it using a plug-in like PitStop might do the trick. More information can be found in this B4print forum thread.
- Some of the more powerful (and costly) editing tools like EskoArtwork PackEdge have sophisticated bleed editing tools.
- Sometimes the only solution is to enlarge all pages a tiny bit (101%) to make their content extend beyond the trim size.
- In some cases, typically very short run digital jobs in which cost is a major factor, a printer might decide to undercut the job. The fact that this makes the pages smaller than they should be is not always an issue.
Source: https://www.prepressure.com/design/basics/bleed?utm_campaign=InternalLink&utm_medium=PopularPages&utm_source=Bleed
No comments:
Post a Comment
Hi All, Please leave a comment. ^_^