Spot colors can be used with CMYK or Multichannel documents intended for print to add additional colors, create “bump plates,” and to control varnishes. They can add a bunch to your printing bill. Or they can reduce your print costs – think about using black and a single spot color for some projects.
Spot color channels are designed to provide a channel for additional inks to be used in commercial printing. The location in the image where the ink should be applied is stored in the spot channel. A separate printing plate is generated, and an additional run through the press is required. This usually increases the cost of the print job.
If you need to ensure an exact match for a corporate logo, you may want to use a spot color. Another typical use is extending the color range of an image beyond those that can be produced using the CMYK inks. Neon and metallic colors can be added with spot channels. Spot channels can also be used to identify areas of an image over which a varnish will be applied.
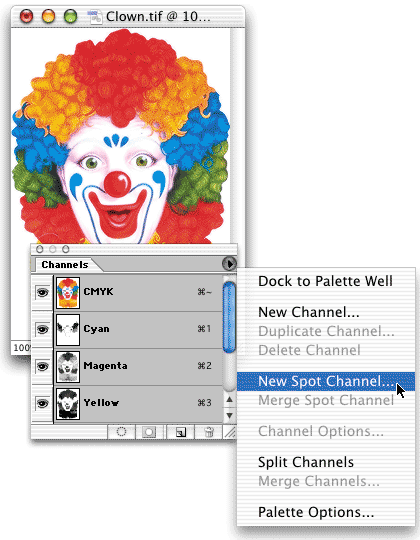
A spot channel is added to the image – and to the Channels palette – using the Channels palette menu command New Spot Channel. If you have an active selection in the image, the spot channel will automatically be created from it. With no active select, an empty channel is created.
The command opens the New Spot Channel dialog box. In the dialog box, click the color swatch to open the Color Picker. Spot colors are typically selected from a Custom book in the Color Picker.
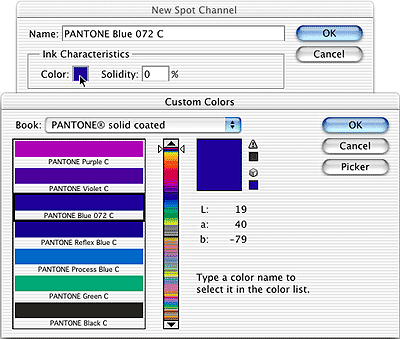
The name of the color selected is automatically updated in the New Spot Channel dialog box, as is the swatch. Solidity refers to how the spot channel will be viewed on screen – it has no effect on printing at all. When set to 100% solidity, the spot color will be completely opaque on screen in areas where it will be printed at 100% ink density. (Lesser tints of the ink, identified in the channel by gray values under 100%, will be proportionately reduced in opacity.) Setting the solidity to 0%, however, does not make the spot color transparent. Rather, it simply reduces the opacity of the spot color areas. Solidity has no effect when the spot channel is the only visible channel.
The Solidity field is previewed live in the image (if you’re creating the spot channel from a selection), so you can experiment with various settings before closing the dialog box. You can also re-open the spot color options to change the setting by double-clicking the spot channel in the Channels palette.
There are three basic techniques for identifying where a spot color will be applied:
• Make a selection in the image before using the New Spot Channel command.
• Create the new spot channel, then use Photoshop’s various tools and commands to create a grayscale representation of the spot color.
• Make a selection with one or more channels active and copy, then paste into the spot channel.
Spot channel information does not appear in the Layers Palette. You edit the spot color information by editing the spot channel. Remember that the spot channel is a grayscale representation (even when the Preferences are set to show it in color). Paint with shades of gray, not the spot color itself, in the spot channel. Painting with black produces areas of 100% spot color tint.
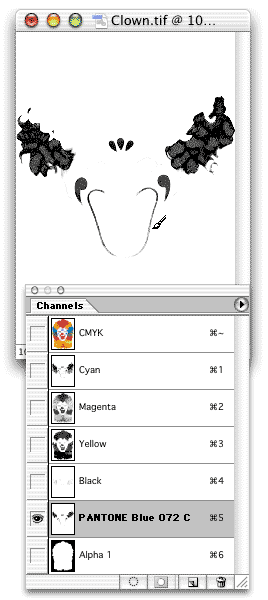
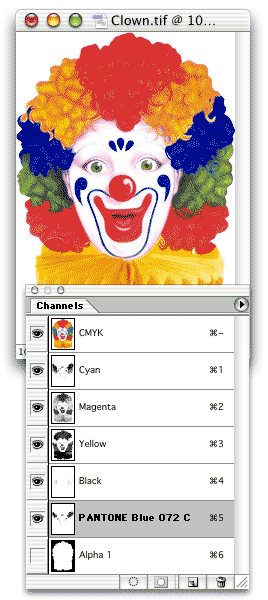
To show on screen where the spot color will print, the spot channel must be visible in the Channels palette. It can be made visible by itself for easy editing (as is shown above), or it can be shown in conjunction with the composite channel (or any of the color channels).
Spot channels don’t interact with layers, so adding a type layer in a spot color is out of the question. Instead, create a type mask in the spot channel and fill the selection with black. The Type tool will automatically enter type mask mode when a spot color channel is active in the Channels palette.

For 100% coverage of the spot color, make sure to fill the type selection with black.

Images containing spot channels should be placed into a page layout program in the DCS 2.0 file format. While the advanced TIFF format supports spot colors, your page layout program might not recognize the additional channels or generate color separations from them.
I’ve been asked in the past why spot channels are available for RGB and L*a*b color modes if they’re intended for print. Remember that conversion to CMYK color mode often happens late in a work flow. You can add the spot color channels at any time – they’re maintained when you do your final pre-print color conversion.
In addition, you can use a spot channel as an interim step in an RGB image. Create the spot channel, apply the color. Since the spot color is in a separate channel, it is protected while you continue editing and adjusting the rest of the image. Later, use the Channels palette menu command Merge Spot Channel to integrate that channel into the RGB channels.
Source: http://planetphotoshop.com/working-with-spot-color-channels.html
No comments:
Post a Comment
Hi All, Please leave a comment. ^_^